Knowing how to swing a golf club seems simple. Yet, having a consistent swing with a fair amount of power can be one of the most difficult things in the world.
I’ve been golfing since I was a kid, and one thing I wish I had understood earlier was: proper swing mechanics.
Knowing each step to having a great golf swing can make it easier to find your mistakes, fix them, and stay on track during your round.
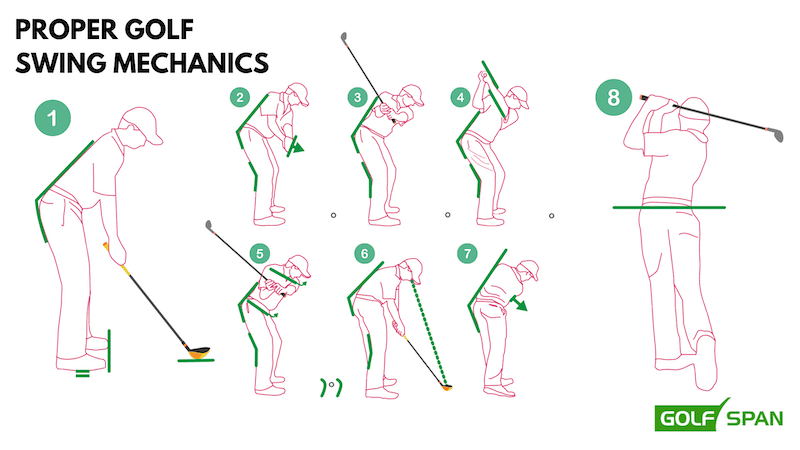
Here’s a quick step-by-step guide on how to swing a golf club:
- Address: Set a strong foundation
- Grip: Use the right strength and type
- Takeaway: Maintain the triangle between the club face and your shoulders
- Backswing: Push hands back in a straight line near your back leg
- Transition: Pause at the peak for a smooth and powerful downswing
- Downswing and Impact: Move hips and shoulders together for controlled impact
- Follow-through: Maintain momentum and golf swing form
You won’t want to miss the details of each step, though, since there’s a lot more to it than this. And if you make a mistake at any stage, it could ruin your swing for years.
But don’t worry. This golf swing breakdown will help your understanding; knowing how to swing a golf club is the first step.
Read on to learn the fundamentals of golf swing and how to swing a golf club to take your game to the next level.
1. Address: Set A Strong Foundation
Setting up correctly before you take a swing is fundamental in golf. You’ll learn about the:
Alignment
Alignment are where it all begins; it’s the foundation for where your ball will end up.
- Ensure feet, hips, and shoulders are parallel to the target line.
- Use a club on the ground aligned with your toes to check if it points at your target.
- Visualize a line from your back shoulder to your front shoulder and back foot to the front foot, aiming at the target.
Stance: Open vs. Closed

Your stance refers to how you position your feet and hips. You have two options for stance, so give each a try to see which works best for you.
- Open Stance Swing: Ideal for players who struggle with hooks and want to encourage fades. The feet and hips are angled away from the target line. This stance, however, may reduce distance and lead to slicing.
- Closed Stance Swing: Suited for players who tend to slice and wish to promote draws. Feet and hips cross the target line, encouraging an inside-out swing path. The closed stance is the more common choice if you’re unsure which to use.
Posture: The Foundation of Your Swing
Correct posture is essential for power and consistency. Your swing posture should be comfortable, with your arms hanging naturally before gripping the club.
Balance: The Key to Stability
Proper balance is necessary for a controlled and powerful swing.
- Distribute weight equally on the balls of both feet.
- Balance shifts from the trailing foot in the backswing to the leading foot in the downswing.
Ball Position: Determining Your Impact Point
The position of the ball in your stance affects the angle and distance of your shot.
- Adjust ball position according to the club: center for mid-clubs (like irons), forward for longer clubs, backward for shorter clubs.
- Your feet should be wider than shoulder-width, with the golf ball toward the middle of your stance.
Club and Body Distance: Ensuring Correct Reach
Finding the right distance between you and the ball is critical for an effective swing.
- Stand close enough so that the middle of the clubface reaches the ball with your arms extended but relaxed.
- Tilt your upper body slightly away from the target for a balanced posture.
You can develop a solid and effective golf stance by carefully considering each aspect. However, this is just the beginning. The next part to focus on is your hands.
Want to check out some of the weirdest golf swings in history? Read the full post.
2. Grip: Use The Right Strength and Type
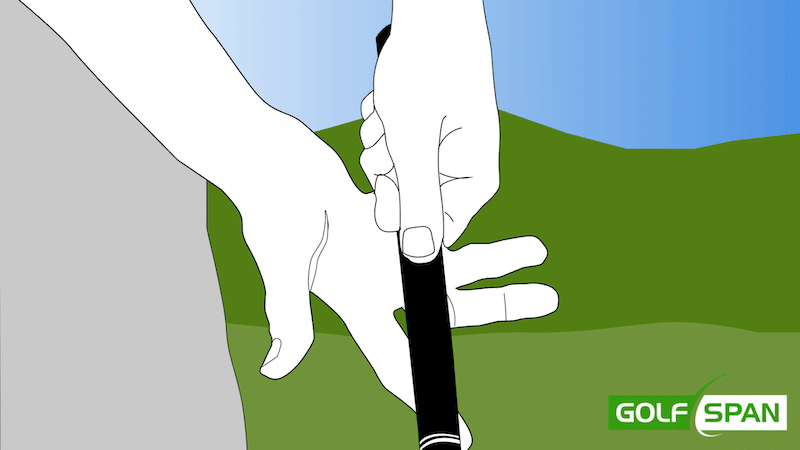
Knowing how to grip a golf club is the next step to mastering your swing, and it’s a two-part process. Then, you need to work on grip strength and type.
How To Grip A Golf Club
Gripping your club has two simple steps:
- The top hand, or lead hand, starts holding the club. The grip should go from the start of your fingers to the base of your palm. Close your hand so your thumb is slightly off-center, pointing towards your back shoulder.
- The bottom hand or trailing hand is added to the grip. Link your bottom hand’s little finger with your top hand’s index finger (this is an interlock or overlap grip). Rest your bottom hand’s thumb in the top hand’s palm. Your bottom hand’s thumb should also point to your back shoulder.
This is the basic starting point. However, you’ll want to vary your grip strength and type to match your swing.
Grip Strength
There are three different grip strengths:
1. Neutral Grip
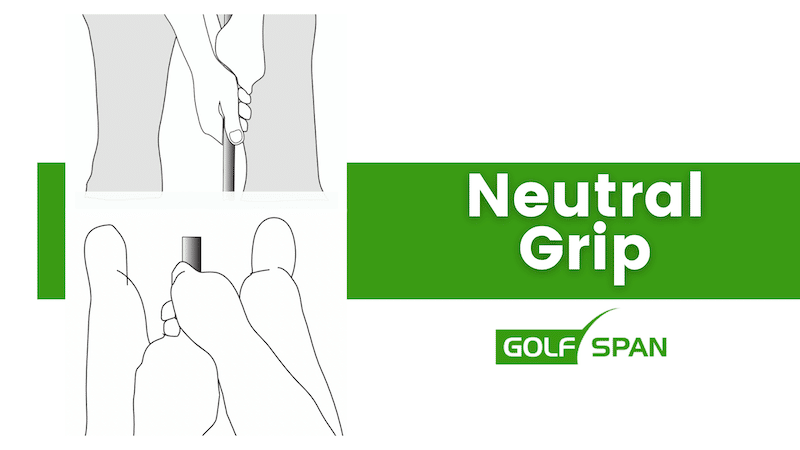
The neutral grip starts by positioning your clubface square to the ball at the address.
Position your leading hand on the grip and ensure that only the knuckles of the leading hand’s index finger and middle finger are visible. Position your trailing hand below your leading hand and ensure that only the knuckles of the trailing hand’s index and middle fingers are visible.
2. Strong Grip
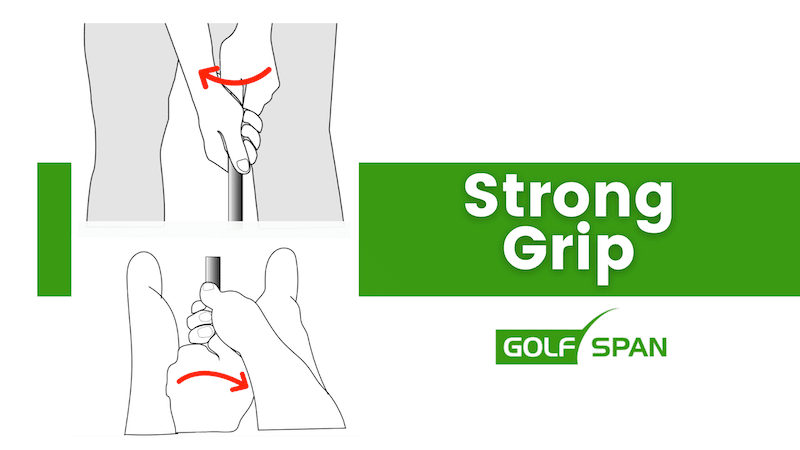
The stronger grip promotes a closed clubface at impact, resulting in a draw or a hook due to your hands turning over.
Place your leading hand on the grip, followed by your trailing hand. Now, the knuckle of the ring finger will be visible together with the two knuckles on the neutral grip.
3. Weak Grip
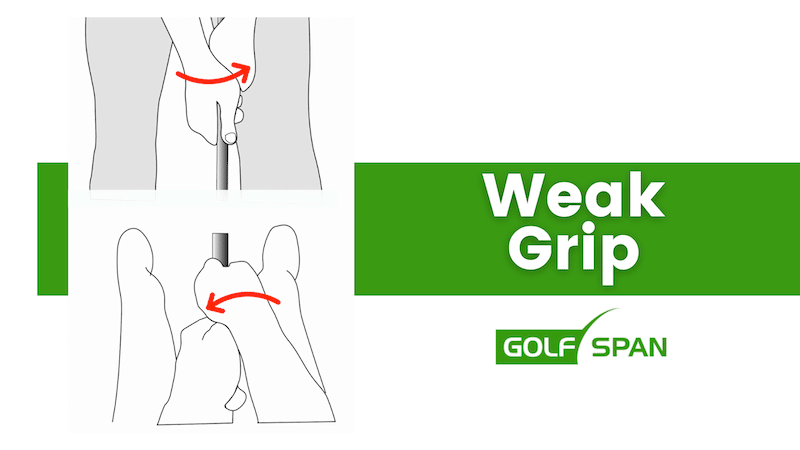
A weak grip is the opposite of a strong grip, with the hands leaning more toward the non-dominant side. This results in an open clubface at contact and a left-to-right ball trajectory.
Grip Types
The types of grips used by golfers are conditional on the golfers’ hand size and personal preference.
1. Vardon Grip / Overlapping Grip
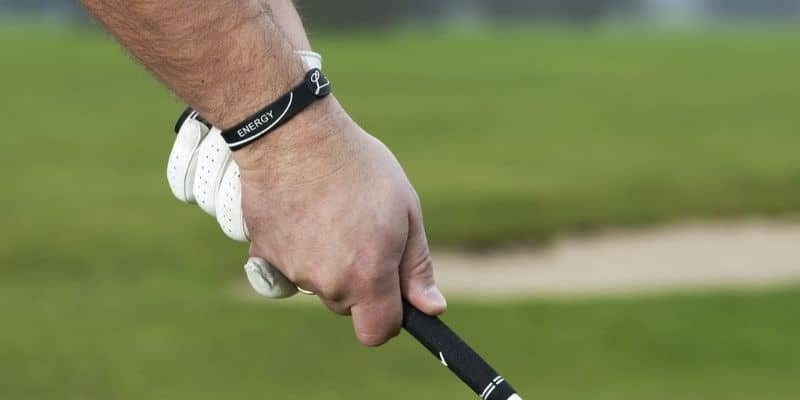
The Vardon Grip, also often described as the overlapping grip, was introduced by Harry Vardon around the turn of the 20th century. It’s the most used and recommended by experts and my go-to grip. It’s more suitable for golfers with larger hands and longer fingers.
The pinky finger of your trailing hand overlaps the trench between the index and middle finger of the leading hand. The thumb of the lead hand lies in the trailing hand’s lifeline.
2. Interlocking Grip

The second most used grip is the interlocking grip often employed by golfers with smaller hands and shorter fingers.
Like the overlap grip, you connect the trailing hand’s pinky with the leading hand’s index finger. Unlike the overlap grip, you interlock your pinky so it’s more secure than just resting it, promoting control through the interlocking position. The thumb of the lead hand lies in the trailing hand’s lifeline.
3. Ten Finger Grip / Baseball Grip

The ten-finger grip, or baseball grip, resembles how batters hold a baseball bat, with both hands placed beneath each other with no link between the hands. Golfers who have difficulty flexing their fingers or with small hands prefer this.
Place your lead hand on the handle first and then the trailing hand. Push the hands together until the trailing hand’s pinky touches the index finger.
Read more guides for beginner golfers, so you can set the proper foundations.
3. Takeaway: Maintain a Triangle Between the Club Face and Shoulders

Any flaws at the beginning of your takeaway will impact the finish.
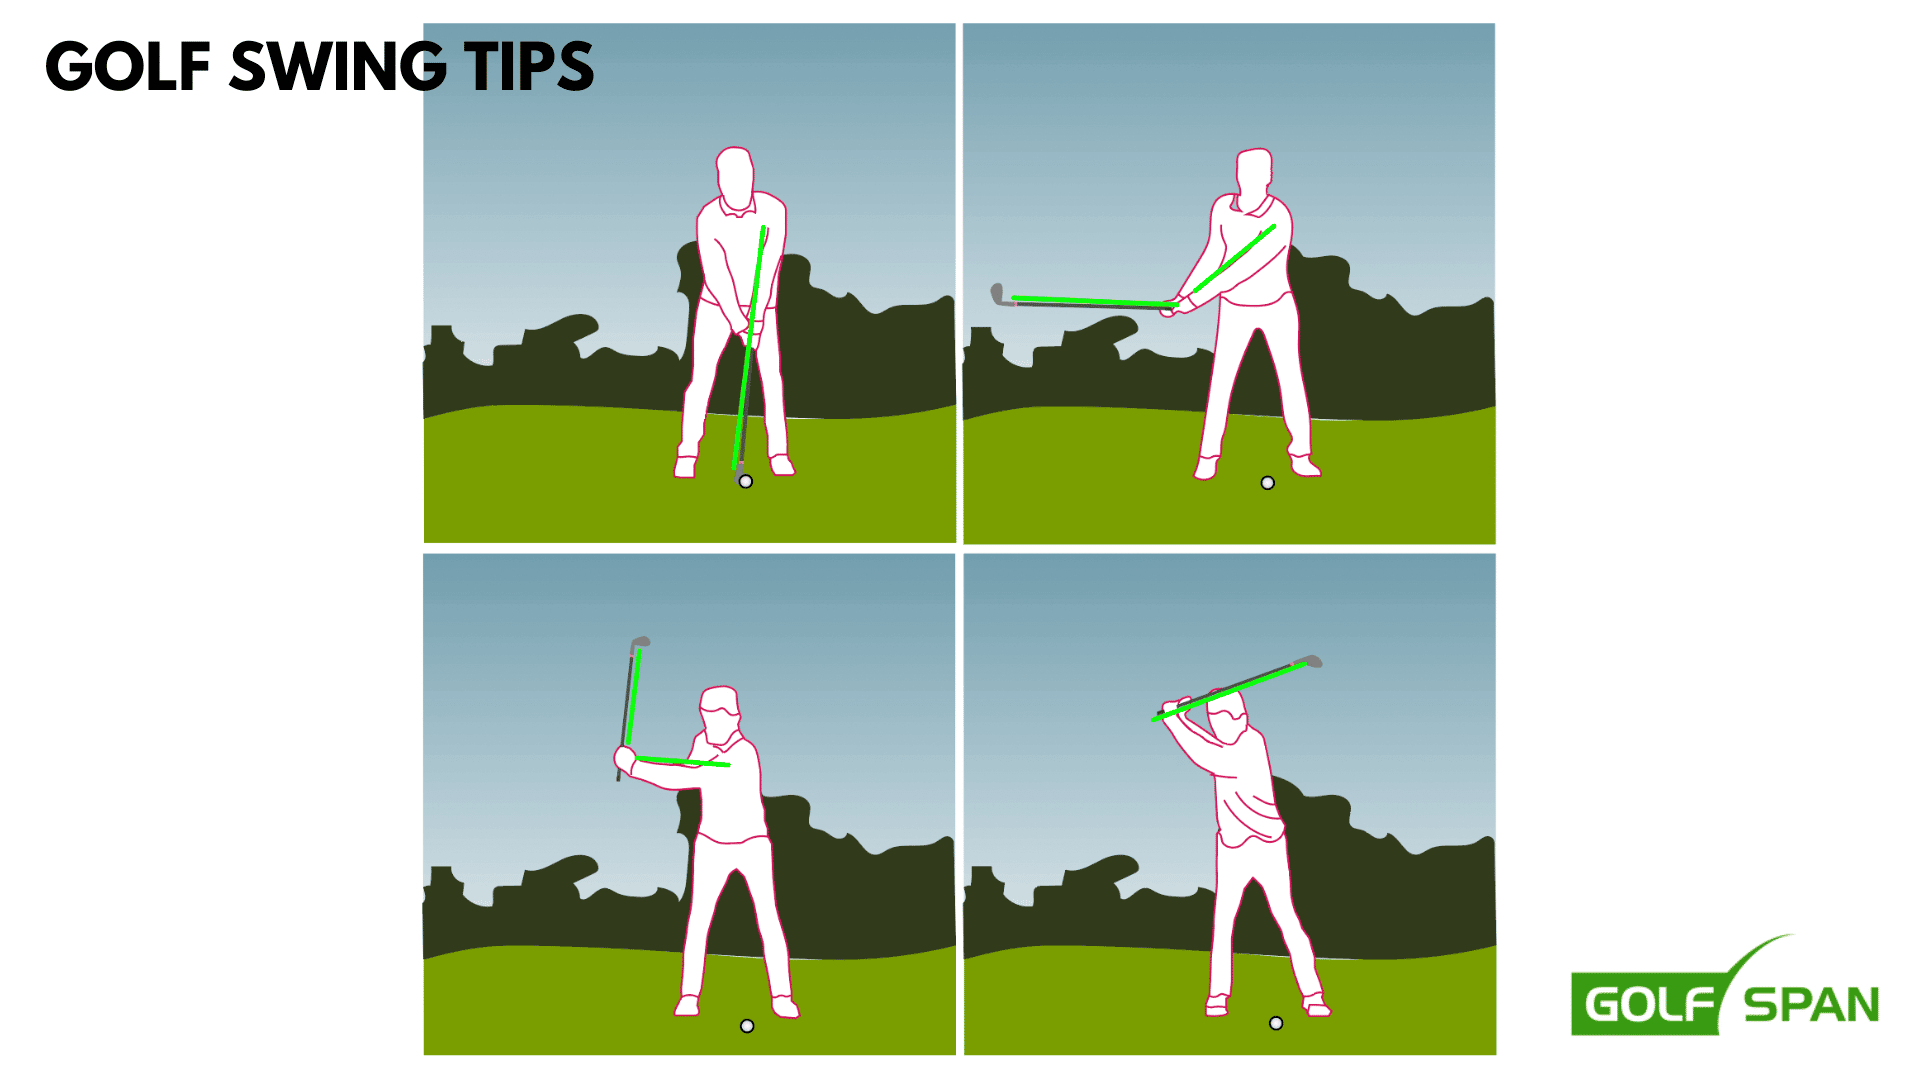
Start by turning your torso to the right without sliding your lower body to the right, concentrating on coiling your shoulders to produce the power essential for the downswing. Make a long and effortless takeaway while keeping your hands and arms steady. The swing should feel as effortless as possible.
Try The 1-Piece Takeaway: The 1-piece takeaway results from maintaining the triangle in one piece for as long as possible by keeping your wrists intact. The early cocking of the wrists has led golfers to employ this technique but fail to achieve the maximum distance that they are capable of.
4. Backswing: Push Your Hands Straight Back Near Your Back Leg

A poor backswing can and will majorly affect the full swing. Here are the steps to execute the backswing:
- Start by pushing the hands back in a straight line while holding them near your back leg. Ensure that your front arm remains extended at the elbow.
- As the club face pivots towards the back between your leading arm and the club shaft, the shaft turns roughly parallel to the ground.
- Rotate your torso and transfer the weight from the ball of your front foot to the ball of your back foot.
- When moving your arms parallel to the ground, your wrist will start to cock, and the club ought to be virtually at right angles to your front arm while the club is aiming marginally outside the golf ball.
- Continue pushing your hands and arms back until the club faces down the target line.
Top of the Backswing: Your front shoulder should turn behind the ball to reach the top of the backswing. Avoid the impulse to stand up and keep your posture and balance by bending your back leg. When reaching the top of the backswing, your body should be completely coiled and geared up for the downswing.
5. Transition: Pause at the Peak

The pause at the top end of the backswing allows you to harmonize all the moving parts in your swing, creating an effortless rhythm for solid contact. Hold your top position for a moment before you start your downswing.
6. Downswing and Impact: Move Hips and Shoulders Together

The downswing in golf is crucial for building speed and ensuring a powerful impact. It begins slowly and gains momentum for maximum velocity at the moment of impact. Here’s how to execute it effectively:
- Start Smoothly: Begin your downswing slowly and smoothly, focusing on gradually increasing speed.
- Coordinate Hips and Shoulders: Initiate the downswing by moving your right shoulder and hip in harmony toward the ball’s direction.
- Let Arms Fall: Ensure that your arms, not your shoulders, fall downwards to gain peak speed at impact.
- Hip Leads the Swing: Your hips should lead the swing, turning to the left and preventing a reverse pivot.
- Avoid Early Hip Push: Start the downswing without pushing your hips forward too soon to avoid leaning back (reverse pivot) and potential slices.
By following these steps, you create a harmonious and powerful downswing. The key is in coordination and timing – starting slow and allowing your lower body to lead while avoiding common mistakes like the early hip push and reverse pivot. This technique not only maximizes your swing speed but also improves accuracy and control.
Weight Transfer
Effective weight transfer during the downswing is vital for a powerful and accurate golf shot. Here’s a step-by-step guide to ensure proper weight distribution:
- Start the Transfer: As you begin your downswing, shift your weight from the ball of your trailing foot to your front foot.
- Knee Flexibility: Maintain the flex in your left knee (for right-handed golfers) to aid the smooth transfer of weight to the front foot.
- Knee Movement: Allow your bent knees to shift forward toward the target as part of this transition.
Remember to avoid common pitfalls:
- Delayed Weight Transfer: Avoid transferring your weight too soon; this needs to be timed with your downswing.
- Hand Movement Caution: Be careful not to start moving your hands too quickly. Incorrect hand movement can alter the clubhead angle and impact the direction and accuracy of your shot.
By mastering the weight transfer, you enhance both the power and control of your swing. It’s about finding the right balance and timing – ensuring that your body moves in harmony for an effective and efficient golf shot.
Impact
At impact, your shaft should be tilting toward the target, and your hands ahead of the ball. This position will promote contact with the ball before making it with the ground so you can hit it better.
7. Follow-Through: Maintain Momentum and Form

Executing a proper follow-through is essential for an effective golf swing. Here’s how to ensure you complete it correctly:
- Complete the Swing: After making contact with the ball, continue the motion. The swing isn’t over at contact; it’s vital to keep the club moving.
- Body Rotation: Finish with your body rotated about 90 degrees, ensuring your belt buckle points towards the target.
- Club Position: The club should end up positioned behind you.
- Weight Distribution: Your weight should shift to your lead foot, with your trailing foot balanced on its big toe.
- Posture: Maintain a posture that feels natural and balanced, as if you’re posing for a photograph, watching your ball soar.
Avoid Common Mistakes
- Halting at Impact: Many golfers mistakenly think the swing is complete upon hitting the ball. This abrupt stop can decelerate the club head at a crucial moment, leading to an incomplete swing and negatively affecting ball trajectory and balance.
- Incomplete Rotation: Failing to rotate your body fully can hinder the effectiveness of your swing and the distance your ball travels.
Remember, a complete follow-through is as important as the initial contact. It ensures maximum acceleration through the ball, improving your shot’s power, accuracy, and balance.
7 Tips to Build a Great Golf Swing
- Control Direction with Left Hand: Direct the ball by pointing the back of your left hand toward your target during the swing. This technique helps to close the club face and draw or fade the ball, enhancing accuracy.
- Improve Grip for Straighter Shots: A good grip connects you to your swing. Soft but firm gripping helps straighten shots, and finding the right grip style is key.
- Build Your Own Golf Swing: Embrace your unique swing style. While lessons can be valuable, time and practice will help you develop a swing that works best for you.
- Count for Better Tempo: To improve your swing tempo, mentally count during your swing – “one” at the start, “two” at the top of the backswing, “three” at impact, and “four” at the finish. Aim for a 3:1 backswing-to-downswing tempo ratio.
- Know Your Target: Focus on your aim, not just the swing. Pick a small target and align your swing towards it to enhance accuracy.
- Refine Your Stance for a Better Strike: Adjust your stance for better balance and rotation. A balanced, athletic stance helps achieve consistent, centered strikes.
- Mind-Body Coordination: Maintain a strong mindset and coordination during your swing. Golf requires precise timing and consistency, making mental focus as crucial as physical execution.
Read More: How To Hit A Golf Ball Straight
How To Shift Your Weight During Your Golf Swing
In golf, mastering weight shift during your swing is crucial for power and accuracy and it doesn’t fit neatly into the steps above:
Here’s a step-by-step guide to help you get it right:
- Weight at Address: Begin with a balanced stance, distributing your weight evenly (50/50) between both feet. Some pros advocate a 40/60 split with more weight on your back foot. Then you want to finish with the most weight on the front foot (90/10).
- Turning, Not Swaying onto the Back Foot: Focus on turning your body instead of swaying. Don’t let the weight shift to outside the back foot. Keep your lower body movements contained, as if you’re swinging within a barrel, to maintain a centered position over the ball.
- Getting onto the Front Foot: The transition from backswing to downswing starts with shifting weight onto the front foot and clearing the left hip. This allows the arms to swing through freely.
- Over-the-Top Move: Avoid starting the downswing with arms and shoulders, as it leads to common errors like slices or hooks. Ensure the club shaft remains close to the body to preserve power.
- Rushing the Transition: Resist the urge to rush from backswing to downswing. A hurried transition disrupts the swing sequence and reduces power.
- Consistent Grip Pressure: Maintain the same grip pressure throughout the swing. Altering it during the downswing can disrupt the club’s path and impact accuracy.
- Practice Weight Transition and Swing Sequence: Use slow-motion practice without a club to build muscle memory for the correct sequence and weight transition. Gradually progress to half-shots with various clubs, focusing on proper weight shift rather than ball direction.
Read More: Driver swing vs. Iron swing
Golf Swing Concepts To Understand

Now, before I dive into each step and how you can start improving, let’s cover a few key concepts to understand.
- Swing Planes: The trajectory of the club during the swing, critical in determining the effectiveness of your swing.
- One-Plane Swing: In this popular method, the club follows the same plane during both the backswing and downswing, often preferred for its simplicity.
- Two-Plane Swing: A more complex technique where the backswing is upright and the downswing follows a flatter plane, known for increasing swing speed and distance.
- Body-Generated Power: True power in a golf swing comes from a harmonious movement of the entire body, not just the arms.
- Coiling Your Body: Coiling like a spring during the backswing builds potential energy, leading to maximum speed when uncoiled.
- Keeping Your Head Down: A common mistake is lifting the head too early. Staying focused on the point of contact ensures more reliable hits.
- Challenges of Head Movement: Lifting your head due to fast swing speed or inclination can cause mishits, emphasizing the importance of maintaining a steady head position.
Read more: The Best Golf Swing Analyzers
FAQs
How Can You Swing A Driver?
When you’re swinging a driver, you must hit the ball slightly up rather than striking down as you do with irons. To do this, move the ball to position inside your front foot or parallel to your heel. This will allow you to swing up.
You must also ensure your ball is at the right height for a good impact. Ideally, half the golf ball should be above your driver at the address. I would also recommend almost sweeping the ball off the tee rather than hitting at its base. This will allow you to consistently hit the driver correctly.
How Can You Swing An Iron?
The swing sequence mentioned in this guide applies to irons. Additionally, for irons, you need to hit down and compress the golf ball. You must also remember that the club length decreases as you increase the loft on irons (from a 6-iron to a 9-iron). So, as you go up in the irons, make sure you also reposition yourself to stand closer to the golf ball.
When you’re starting out, you might struggle to hit a long iron, i.e., 3-5 irons. But don’t worry; you’ll improve your long irons as you practice.
How Do I Stop Hitting the Ground Behind the Ball?
Your golf club hits behind the ball for several reasons, including ball position, sliding the hips, head slide, loose leading arm, early release, and improper weight transfer. First, figure out the cause and then work toward improving it.
How Do I Keep My Head Down When Swinging?
Before you take a swing, position your head straight up and down. Especially during the downswing, keep from tilting your head to the right since this commonly creates the problem of putting your head down. Pay attention to how you position your head throughout the swing.
What Part of the Body First in Golf Swing?
For experienced golfers, the pelvis will normally move first. Watching professional golfers, you will notice how their lower body moves first as the upper body turns back.
Do You Keep Your Arms Straight When Swinging a Club?
You can take shots where you bend your arms, but most golf experts agree that straight arms give you better shots. Having straight arms will encourage rotation, power, consistency, and speed. All of those things matter when it comes to golf.
Final Thoughts
The golf swing is a complex process whereby many moving parts combine to connect the head and the golf ball.
You may struggle to execute this extraordinarily complex process without knowing the complete process of the golf swing. Knowing and understanding the golf swing mechanics will enable you to refine golf swing errors and improve your golf game so that you know how to swing a golf club properly.
While it does seem like a lot to think about, take it one step at a time and read through the article again from time to time to see where you might be lacking.
We hope this article explains the golf swing simply to support you in developing your swing. It can also aid you in the future to fix your swing when you encounter struggles when you hit the ball. Learning how to swing a golf club is an ongoing process that you improve over time.
Related Articles
Nick is the founder of GolfSpan and an avid golfer. He's not quite a pro but has over 15 years of experience playing and coaching golfers worldwide. His mission is to bring the golfing community a better experience when it comes to choosing the right golf gear and finding the right setup for your game.


