We have come a long way since the first golf simulator hit the market in the 1970s. Back then, companies purchased a simulator and charged individuals to try a shot on it. But the world of golf simulators has moved on a lot since 2020 marked a key turning point when many of us were confined to our houses. It caused the DIY golf simulator home setup to boom in popularity.
This guide aims to teach you how to build a golf simulator in your home. A DIY golf simulator is a technical golf system you build to practice indoors. Using a combination of apparatus and software, you can track your form and improve without leaving the comfort of your own home.
You need several pieces of equipment that must be compatible with one another. We’ll cover all the necessary equipment and what you can expect to pay to make your dream games room a reality.
What Is a DIY Golf Simulator Setup?
A DIY home golf simulator setup requires you to source each component of a golf simulator separately and assemble it yourself. It is typically a more affordable option than acquiring a simulator from giants, such as Foresight Sports or Trackman.
You will need an:
- Launch Monitor
- Computer
- Software
- Projector
- Screen
- Impact mat
- Net
- Enclosure
- Sufficient space
I will detail the essential materials in the next section.
Read more about how golf simulators work by studying our detailed guide.
What Do You Need to Build Your Own Golf Simulator?
Space
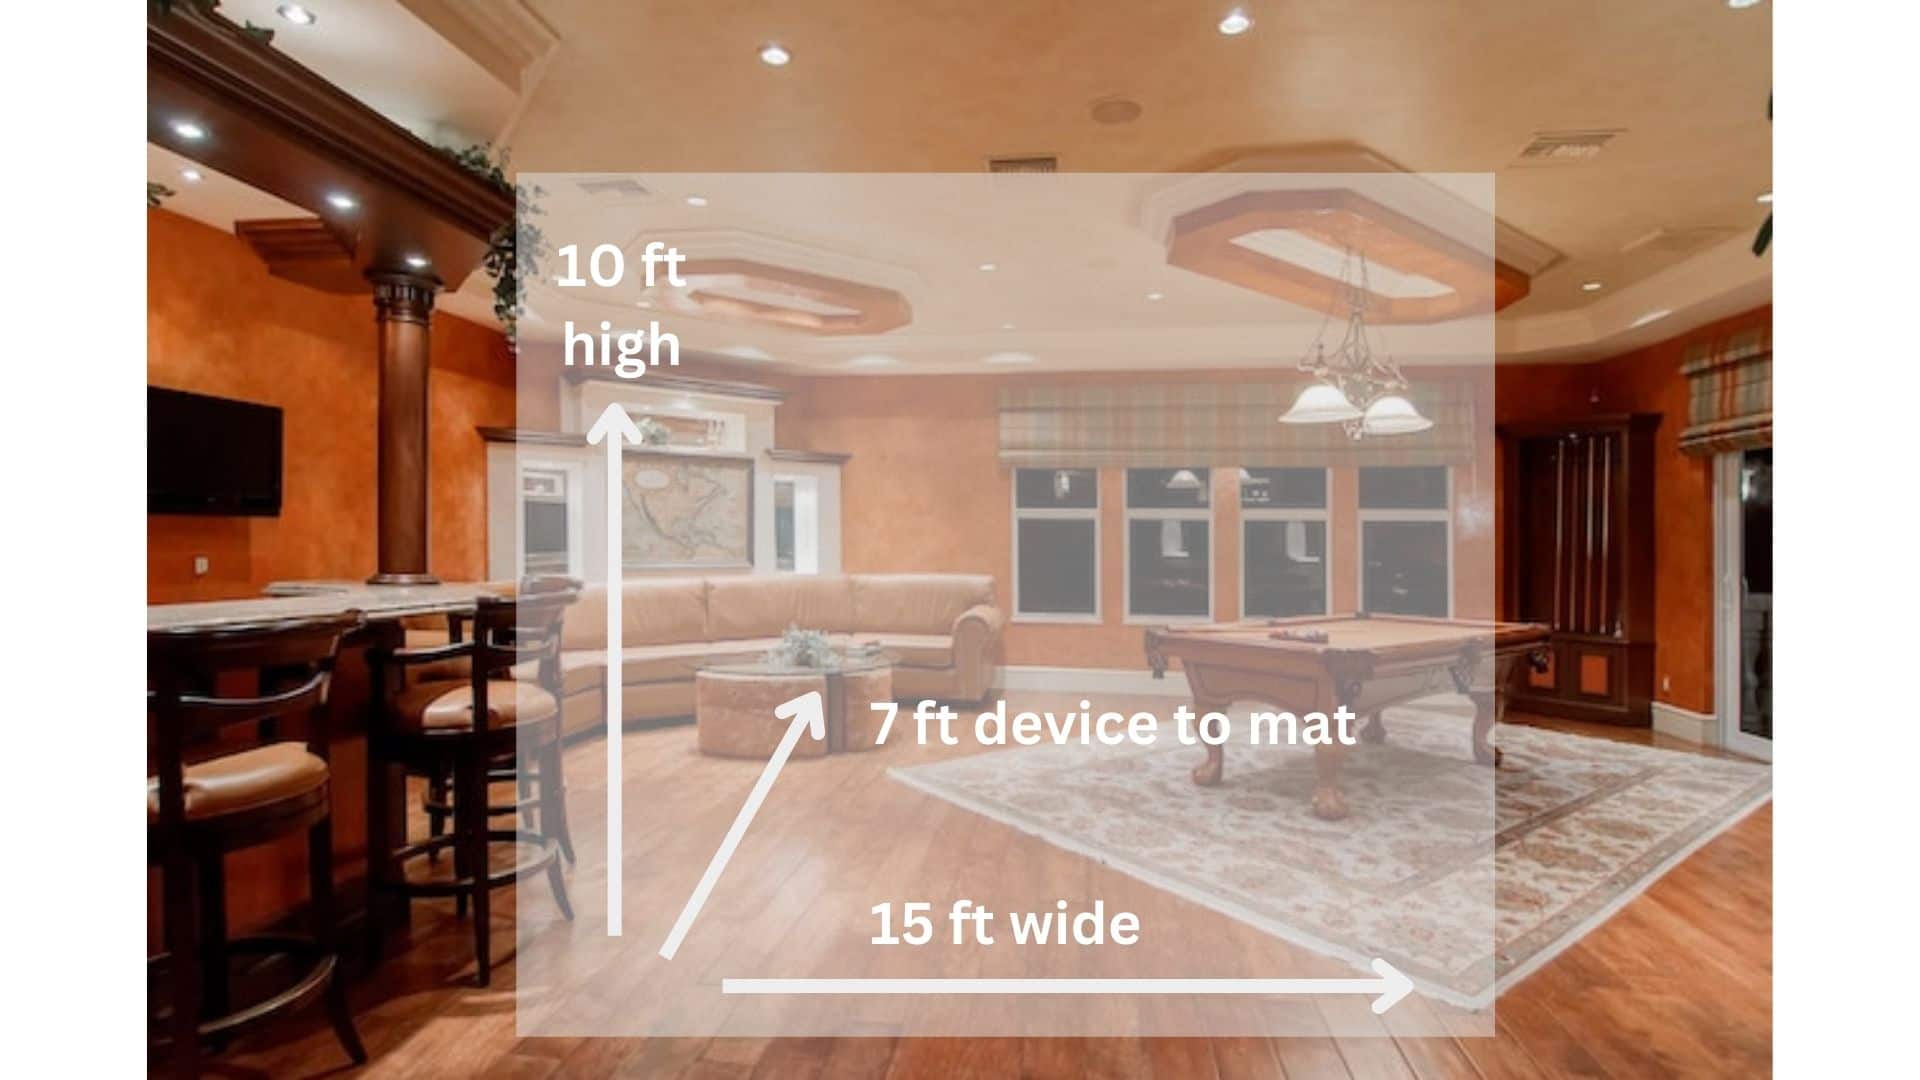
Before building a golf simulator, you need to check the golf simulator’s enclosure size with the space you have at your disposal. You might be surprised by just how much space you need. For example, the Trackman 4 launch monitor suggests 10 feet of room height, 15 feet of width, and 7 feet between the device and the impact mat.
If the ceilings in your room are too low, your clubhead may smash into it on your upswing. Should the space have insufficient width, you risk smacking your clubhead into the wall on your backswing.
Finally, you will need sufficient space between the impact zone and the launch monitor to analyze clubhead and ball data.
If you acquire a launch monitor such as the OptiShot 2, there is no need to worry about space between the launch monitor and the impact zone because the golf mat includes sensors registering data when connecting the ball.
However, OptiShot recommends that your mat is at least 8.5 feet from the impact screen and the ceiling height is 9 feet. If you are under 6 feet tall, you should be safe with 9-foot-high ceilings. Those taller than 6 feet may need a higher ceiling, especially when you swing a driver.
15 feet of width is optimal for this indoor golf setup. It doesn’t hurt to have more space as you are less likely to damage your property. Make sure that there is nothing fragile in your golf simulator room, as a shanked ball can ricochet anywhere.
Launch Monitor

Every golf simulator needs a launch monitor or device to record clubhead and ball data to enhance your experience.
Of course, launch monitors such as the GC Quad or Trackman 4 are typically priced above the budget of the average golfer. However, we have moderately affordable options, such as the FlightScope Mevo. Or the Rapsodo Mobile launch monitor.

In addition, there are alternative options to using a launch monitor, such as the Tittle X lightweight clip-on. It attaches to the shaft of your club and records clubhead and swing data. This device not only offers additional convenience but is also more affordable.
Think of Tittle X as your budget option, running under $200. Conversely, a FlightScope and Rapsodo can usually be picked up for less than $500. The links above show the current prices.
Laptop/PC

Next, you will need a laptop or PC to run the launch monitor’s software. It enhances your experience and displays your shot data and a view of the ball flight. When purchasing a launch monitor, ensure your laptop or PC is compatible.
Most software runs on Windows and iOS, but some only function on one operating system. It makes no sense to acquire a launch monitor that forces you to purchase a new laptop or computer because of incompatibility.
While it’s true that the Optishot runs on both Windows and MacOS, they stopped support for MacOS for new buyers. So unless you already have one and purchased before June 30, 2022, you need a device than runs Windows.
Here are the specs required for Windows and Mac OS computers.
| Operating System Version | Windows 8, 10, 11 | Mac OS X 10.13 |
| Hard Disk Drive Storage | 3GB | 3GB |
| RAM | 4GB RAM | 4GB |
Should your computer not have these specifications, your most affordable route is a Windows laptop for around $250, like the HP 14 laptop. My machine is an HP Pavilion, which has served me well for six years and is still strong.
Software

The launch monitor you decide on may include a standard license for the E6 Connect or World Golf Tour (WGT) software. This subscription typically provides access to one or two courses and a driving range. Plus, it includes various challenges and games to test your skills against your buddies.
Alternatively, you could acquire the OptiShot 2 system, which includes access to fifteen courses, including Torrey Pines South. In addition, you can play six games, hone your skills on the driving range, and alter the weather to enhance the challenge.
Should you wish to upgrade your subscription, you can expect to pay as much as $300 per year in some cases. So, if you are on a budget, I advise sticking with the OptiShot2 simulator.
Read More: Cheapest Golf Simulators
Projector

If you desire the complete simulator experience, you will need a projector to display your shot data and ball flight on the screen.
It is not compulsory to have a projector, but you will need to walk over to your computer after each shot to review the data if you don’t. That means you may not see your ball virtually flying through the air.
There are an array of projectors on the market at various price points. However, if you are building a home golf simulator, you best do it properly. I advise looking for a clear, durable option between $350 to $700.
A projector that I have found to offer exceptional value for money is the Epson VS260. It produces clear, crisp graphics, and a dynamic contrast ratio of 15,000:1. Plus, you enjoy superb color accuracy that enhances the reality of each shot on your golf simulator.
We recommend picking up a short-throw projector if you’re really short of space. These require less space to project media than other projectors, so they are well-suited to golf simulators.
Screen

You could save several dollars and acquire a net. However, a screen is generally the more popular option as it’s better for projecting video. A thicker impact screen slows down your ball and prevents it from flying through into the wall behind.
More affordable options are on the market, but I advise considering a thick, durable construction, such as aikeec. Their impact screens are crafted from quality, thickened polyester and feature 14 eyelets for easy installation.
You have five sizes to choose from, ranging from 98″ x 98″ to 118″ x 157″.
Impact Mat

You need an impact mat to hit off, restricting any possible damage to your floor. There are specific golf mats designed for use indoors, but you can save some cash by acquiring a local supplier’s 5 x 4-inch piece of synthetic turf.
However, if you want to operate with quality equipment, you should consider a GoSports Golf Hitting Mat. This golf mat is thicker, non-slip, and features additional padding to replicate the feeling of standard turf. Plus, it enables you to set up for a drive with a wooden tee.
An impact mat of this caliber will set you back slightly over $100. Check the link above for current pricing.
Net

A net serves as a more cost-effective alternative to a screen and projector combo.
With this method, you’ll likely be viewing your golf simulation from your laptop, so it’s not as immersive as using a projector. However, you could connect your laptop to your TV via an HDMI cable and place it behind the net.
Nets are just as effective as absorbing powerful hits from golf balls as screens and considering the reduced cost, you may well want to pick one up.
DIY Golf Simulator Enclosure

A golf simulator enclosure is not essential to a DIY setup. However, it protects your possessions in the room and others standing nearby. The most affordable enclosure option is to purchase a net and set it up around your simulator.
Of course, a net does not make your setup look as polished as the one in your coach’s studio, but it gets the job done. A solid cage structure will set you back $300 to $500.
One approach is to look at the Yunic Metal golf cage. Its durable structure protects your ball from flying wayward and damaging the room or your guests. It measures 10 feet high and wide — sufficient space to fit any impact screen.
Additional Accessories
Projector Ceiling Mount

If you want to keep floor space clear, a projector ceiling mount is a great accessory to purchase. This model comes in black and white and is universal, so it should fit whichever projector you choose. It’s made of high-grade steel and extends from 15″ to 23″ from the ceiling.
Laptop Stand
It can be a pain to have to constantly bend over to get to your laptop, so consider a laptop stand to save your back. The Techni Mobili adjustable laptop cart is our favorite model. It has plenty of space for a laptop and other accessories. So you don’t need to fiddle around with your laptop’s trackpad, instead, plug in and use a mouse for convenience.
As the stand is on wheels, moving around is super easy. It also comes with 5 years of warranty which is pretty incredible!
Overhead Lights

If the area you’re eyeing up for your golf simulation is looking a little dim, you may want to consider getting some additional lighting. We like tracking lighting, and you can get a complete kit to install into your golf enclosure if you’re going the DIY route.
Golf Club Display Shelf

Want your golf course simulator room to look the part? Why not consider getting a golf club display shelf? Not only do you get to put all of your clubs on display, but you can also organize them and have quicker access. This display shelf by Crestgolf comes in a 9-hole, 18-hole, and 27-hole.
How Much Does It Cost to Build a DIY Indoor Golf Simulator?
Based on the information we have looked at above, you can put together an impressive-looking home golf simulator setup for $1700. That is $100 less than the FlightScope Mevo simulator, not including an enclosure or impact screen.
Read More: How Much Are Golf Simulators?
How to Build a Golf Simulator at Home
Step 1 – Set Up the Enclosure
The first step when assembling a garage golf simulator is to set up the frame for the enclosure. If you’ve purchased a kit, it is as simple as piecing it together in the preferred area of the room. However, if you’re making one DIY style, here is what you will need.
- 10 ft x 1″ electrical metallic tubing pipes
- Ball bungee cords
- Pipe cutter/saw
- Frame corner fittings
Process
- Cut pipes to the desired length relative to your screen size. We recommend adding a 0.5″ buffer.
- Slot the pipes into the fittings
- Tighten the connector screws
Top tip: As an additional step, you can consider adding foam insulation over your electrical metallic tubing pipes. This will help to prevent hard bounces if your ball directly strikes the frame rather than the screen.
Step 2 – Put the Screen Up
Once the enclosure is complete, it is time to put your screen up. Connect the corners of the screen to the frame, and ensure that it is stretched out to its maximum ability.
If you’ve gone the DIY route, it’s time to take your ball bungee cords out. Loop the cords around your golf enclosure’s frame and stretch the cord over the ball to be tight. You can loop the cords multiple times or create a knot if it’s loose.
Alternative Steps 1 & 2 – Create the Frame and Install the Net
The process for setting up a DIY golf net is largely the same as setting up a standard golf simulator enclosure with a screen. However, we’re opting for PVC rather than metal with this option to save money.
You will need:
- High impact net
- 1.5″ PVC pipes
- 1.5″ PVC 5-way cross fittings
- 1.5″ PVC elbow fittings
- Screw hooks
- Pipe cutter/saw
Process
- Position your base pipe on the floor and attach a 5-way cross fitting on either side
- Add vertical pipes to both cross fittings
- Cut one pipe into six equal pieces using a pipe cutter or saw. Attach these to the three remaining slots of each cross fitting
- Attach the final pipe to the vertical pipes using the elbow fittings
- Drill several holes along the inside of the pipes
- Attach screw hooks into the holes
- Secure your net to the frame using the screw hooks
Optional – Attach Side Curtains
If you’ve purchased and built a golf enclosure, there is no need to attach side curtains as you already have protection on the sides. However, if you have built the likes of a net enclosure, you have no side protection, so curtains are advisable. They are also pretty handy in that you can retract them when you are not using your golf simulator.
We recommend attaching the curtain rails directly to your ceiling. However, the drawback to this is that you’ll have to take the curtain rails down if you decide to move your golf simulator elsewhere.
Step 3 – Position the Impact Mat
If you’ve purchased an impact-hitting mat, the majority of the heavy lifting is now over. Now it’s time to place the impact screen in a position that is far away enough from the screen to measure launch and ball flight. If you are unsure how far away it should be, run a few tests with the software to see where it works from.
If you’re instead set on making your own, here is what you will need and the process.
Equipment
- 4 ft x 8 ft lauan plywood sheets
- 4 ft x 8 ft insulation board
- EVA foam mats
- 8 ft x 8 ft outdoor carpet
- Driving range mat insert
Process
- Glue each sheet of the lauan plywood to either side of the insulation board
- Cut out a hole in your EVA foam sheets where you want to place your driving range mat insert, then glue the sheets down on top
- Repeat step 2 for the outdoor carpet
- Glue down the driving range mat insert in the hole you left in your EVA foam and carpet layer
Step 4 – Set Up the Software
As I mentioned, the software comes with your launch monitor product, which depends on licensing agreements. The most popular software options are E6 Connect and World Golf Tour.
You must download the relevant software and complete the setup process before it is ready for use.
Once the software is ready, you can begin swinging to reap the rewards of your hard work.
Read More: Best Projectors
Homemade Golf Simulator Frequently Asked Questions
How Much Is A Homemade Golf Simulator?
Building a solid homemade golf simulator setup will cost you around $1900. That is almost ten times less than an entry-level structure from brands such as Trackman or Foresight Sports.
How Do I Make A Cheap Indoor Golf Simulator?
To make a cheap indoor golf simulator, you need an affordable launch monitor, impact screen, and a mat. Once you purchase these products separately using the links I provided above, you will have an affordable indoor golf simulator.
How Tall Of A Ceiling Do I Need For A Golf Simulator?
According to Trackman, you should have at least 9-feet and 10-inches of space from floor to ceiling to comfortably swing your golf club. Anything shorter than this is at risk of your clubhead smashing through it.
How Far Should A Screen Be From A Golf Simulator?
Trackman once more informs us that the ideal distance from the screen to the impact mat is 7-foot, 5-inches. Anything closer than that may struggle to calculate the flight and launch of the ball accurately.
Does Hitting Off Mats Hurt Your Golf Game?
Tour Golf Experience explains that hitting off mats can reduce your fat shots, even if you attack the ball from a steep angle. While your clubhead may strike the ball cleanly off of a mat with a steep angle of attack, doing this on the course can cause your club to dig into the turf.
How Far From The Wall Should A Golf Impact Screen Be?
On average, you should prepare 12 to 16-inches of space between the impact screen and your back wall. That provides enough room for the screen to slow the ball down if it breaks through without it ricocheting violently off the wall.
Final Thoughts
There you have the answers to how much it costs, what you need, and how to build a DIY golf simulator. You can save significantly by purchasing the parts individually compared to acquiring a complete golf simulator set.
Overall, if you acquire an affordable launch monitor and follow the steps mentioned above, you can expect to set up a home golf simulator for under $2000.
After reading this, if you’d rather buy a ready-made golf simulator, the Flightscope Mevo is a great budget option. You can check the best garage simulators as well. Or if you are a golf business looking for a more advanced setup, read about the best commercial golf simulators.
Alternatively, if you don’t have the time to build your own golf simulator, you can find various options (including budget options) in our review on the best golf simulators.

Matt has played golf since he was 4 years old and has written over 150 articles at GolfSpan since 2021. Matt specializes in product reviews using his postgraduate degree in Sports Marketing from Johan Cruyff Institute. Matt has a handicap index of 10.8 and currently plays weekly at Pilar Golf Course near his home in Buenos Aires, Argentina. He also loves his Callaway Odyssey Exo Rossie putter and likes a pepper steak pie with curry gravy at the turn. You can connect with him on LinkedIn.