The golf shaft is often said to be the engine of the golf club. The right shaft can help a golfer create consistency in their strike.
Having your clubs reshafted occasionally should be seriously considered by all serious golfers. Learning how to do this on your own will save you some money. In addition, it will help increase your golf knowledge to help make you a better golfer.
So, here’s how to reshaft a golf club:
- Select the right shafts for your game
- Gather supplies and setting up your workstation
- Remove existing shaft
- Prepare the clubhead
- Install the new shaft
- Adjust length if needed
- Finish the process with a new grip
The Importance Of Reshafting

With so many golfers playing with a club with an incorrect shaft, the importance of having the correct shaft can not be stressed enough. Many adverse things can happen when a golfer plays a club with the wrong shaft.
Potential consequences of playing the wrong shaft include the following:
- A shot that launches too low
- A shot that launches too high
- A shot that spins too much
- Loss of distance
- Loss of control
- Inconsistency
As you can see, playing the wrong shaft can cause many issues for a golfer. On the flip side, having the optimum shaft in your clubs can help in many ways. Some benefits include:
- More consistency
- More control
- More distance
- More confidence
Read more: How To Pick The Right Shaft For Your Driver
How to Determine if Your Club Needs to be Reshafted
The most obvious situation where you would need to reshaft your clubs is a broken shaft. Beyond that, there are other reasons why you should consider reshafting your clubs.
If you have been playing a set of clubs for quite a while, you are a good candidate to consider reshafting. Although the modern materials used to create most shafts are very durable, they will wear over time.
Another point of consideration is how your swing may change over time. Perhaps you are taking lessons, and your swing mechanics are slowly improving. This will be a point where you should consider being fit for clubs that fit you better. The club shaft will usually be the biggest thing needing updating in this scenario.
Are you getting stronger and faster? If so, a shaft change will definitely be in order.
Or, on the flip side, maybe you are getting older, and your swing speed is slowing down. In this case, it is worth taking advantage of a shaft to help you maximize your abilities. You do not have to lose distance with age!
What Is The Cost To Reshaft A Golf Club?
The cost of reshafting golf clubs can vary depending on several factors, including:
- The type of club
- The type of shaft
- The cost of labor
Generally, reshafting a single iron or wedge can cost anywhere from $20 to $50 while reshafting a driver or fairway wood can cost between $40 and $100.
However, the cost can be higher if the reshafting process requires additional work, such as adjusting the grip or swing weight. The cost of the new shaft itself can also be a significant factor in the overall cost of reshafting.
High-end shafts made from premium materials such as graphite or steel can cost hundreds of dollars, while more affordable options can cost less than $50.
Overall, the cost of reshafting golf clubs can vary widely depending on several factors. It is best to consult with a professional club fitter or repair technician for a more accurate estimate based on your specific needs and budget.
How To Reshaft A Golf Club: A Step-by-Step Guide

Step 1: Select the Right Shafts for Your Game
Obviously, you will need the new shafts you will install. I highly advise getting fit at a reputable club fitter to choose the best shafts for your game. After you get your recommendations, you can buy and install the shafts yourself.
Read more: The Best Golf Shafts on the Market Today
Step 2: Gather Supplies and Setting up your Workstation
If you are going to tackle reshafting your own clubs, there are several tools you will need to get the job done.
You should have the following on hand:
- Vice Clamp: GolfWorks Quick Shaft Clamp Golf Club Regrip Vise Tool
- Epoxy: GolfWorks EZ Pour High Strength Shafting Epoxy
- Hosel Brush: Golfworks Hosel Brush Honing Wire Tool for Irons – Cleans Out Hosels
- Goo Gone: Goo Gone Original Liquid – 8 Ounce and Sticker Lifter – Surface Safe Adhesive Remover
- Heat Gun: SEEKONE Heat Gun 1800W 122℉~1202℉(50℃- 650℃)Fast Heating Heavy Duty Hot Air Gun Kit
- Hooked Utility Knife: Mudder 13 Pieces Golf Hook Blade Hook DIY Knife Golf Club Blade Tool
- Bench Ruler: Dynacraft Bench Ruler Soleplate Kit Fast, Easy, Accurate Way to Measure Length of a Golf Club
- Shaft Cutting Tool: GolfWorks Hand Held Golf Club Shaft Cutter Tool
- Rubber Mallet: Edward Tools Harden Rubber Mallet Hammer 16 oz
- Regripping Kit: Wedge Guys Golf Grip Kits for Regripping Golf Clubs – Professional Quality
- Heat Safety Gloves: Ergodyne ProFlex 7042 Cut Resistant Work Gloves, ANSI A7, Contact Heat Resistant
- Safety Glasses: NoCry Clear Safety Glasses for Men and Women
- Apron: Homsolver Heavy Duty Vinyl Waterproof Apron
Now that you have all your supplies, you will set up your workstation.
Set up your vice clamp on your workbench. Depending on your vice clamp, you may want to consider a rubber protective shaft protector to go in the clamp.
Read more: The Best Epoxy for Golf Clubs
Step 3: Remove Existing Shaft
Depending on what type of shaft you are replacing, steel or graphite, you will have a slightly different process.
Steel Shafts:
Put your club securely in the vice clamp. Using the heat gun, heat up the ferrule for about 20 seconds and then cut it off with your utility knife.
What is the ferrule? It is a small piece of plastic just above the spot where the clubhead is attached to the shaft. It is used to help secure that connection between the clubhead and the shaft.
Once you have the ferrule off, you will continue to heat up the spot where the clubhead and the shaft are connected. Try for about 30 seconds to start.
Wearing your protective gloves, try pulling the clubhead from the shaft. If it is difficult to get off, heat up a little more and try again. Repeat until you can remove the clubhead.
Graphite Shafts:
The overall process for removing a graphite shaft from the clubhead is relatively the same. The biggest difference is the caution you must take in this process.
The graphite shaft is more fragile than a steel shaft. Because of this, you need to resist the urge to twist the clubhead as you attempt to pull it off. The shaft itself could splinter and leave pieces in the hosel of the clubhead. This could potentially make cleaning that out difficult.
Step 4: Prepare the Clubhead
Next, you will prepare the clubhead for step 5, which is the actual installation of the new shaft.
Using a handheld drill and your hosel brush attachment, clean out the hosel of the clubhead. You are looking to remove any reminisce of the epoxy that was there from the previous shaft. You may also want to use a cloth and a cleaning solution such as Goo Gone to help.
Step 5: Install the New Shaft
Once the clubhead is prepared, inserting the new shaft into the hosel is time.
Cover the tip of the shaft with a generous amount of epoxy. From there, slide the tip of the shaft into the hosel of the clubhead and continue to rotate it until it feels secure. Make sure you have the markings on the shaft facing how you would like them. Some people are particular about that.
Next, remove the club from the vice grip and place the clubhead on the ground. Tap the top part of the shaft to help ensure the shaft is fully set inside the hosel of the clubhead. Perform this with a rubber mallet to not hurt the shaft’s top end.
Let the club shaft cool down, and the epoxy set for about 20 minutes.
Step 6: Adjust Length if Needed
Some shafts come precut to the proper length. Others do not. In that case, use your Dynacraft Bench Ruler to measure out the length to cut your shaft to.
Mark the spot of the shaft to cut. Use your GolfWorks Hand Held Golf Club Shaft Cutter Tool to trim the shaft to the proper length.
Step 7: Finish the Process with a New Grip
Your final step is to put on your new grip. Some will save their old grip and reuse it on the reshafted club. Unless that previous grip was fairly new, I would suggest using a new, fresh grip to finish off your newly shafted club.
Slide your newly shafted club back into the vice grip. Get your Wedge Guys Golf Grip Kit to help finish the process.
Put the grip tape strips on the top end of the shaft. When in place, peel the backing off the double-sided tape. Put a generous amount of the grip solvent over the grip tape. Quickly slide your new grip over the top of the new shaft and on top of the grip tape.
Let each club sit for about an hour before use. This will ensure that the inside of the grip sticks to the shaft securely. This time frame will also allow the epoxy to fully set in the clubhead as well.
Read more: What is a Uniflex Shaft?
How Important Is Your Golf Shaft?
The golf club shaft plays a big part in a golfer’s ability to maximize their potential. The shaft of the club plays the role of helping transfer energy from you, the golfer, into the clubhead and, ultimately, into the ball.
The correct shaft based on factors such as the speed you swing will help optimize your output. A problem I see often is golfers having a shaft in their club that does not match their tendencies (or is the wrong length).
Golfers can have an incorrect shaft in their clubs for many reasons.
The following are just a couple of common mistakes:
- Buying a set off the shelf without being fit for them: This is very common, especially among new golfers. For example, buying a mass-produced box set with all the clubs and a bag is not a one-size-fits-all.
- Simply not knowing: Many golfers do not know the shaft’s importance. This knowledge will help make better choices on the clubs a golfer plays. In the long term, this will equate to better ball striking.
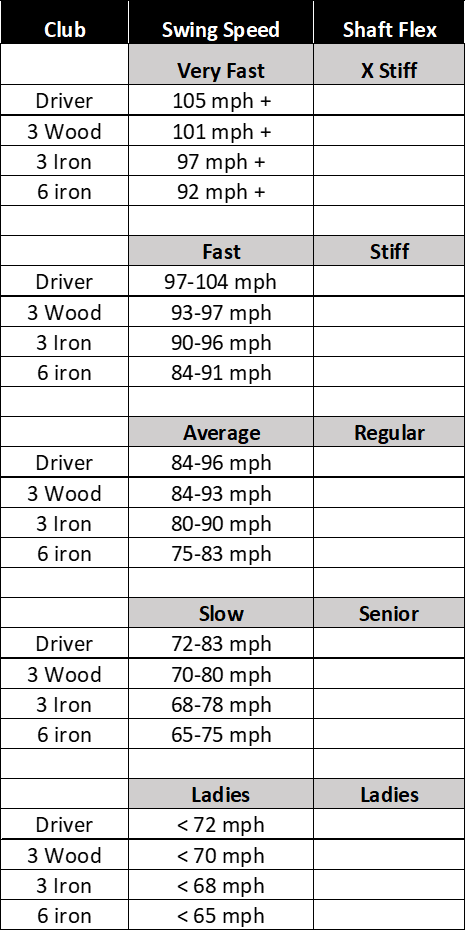
- The macho factor: This, too, is very common. Golfers, especially younger, better players, often think that they are faster club swingers than they are (check out what shafts the pros use). Your swing speed is often the best indicator of what shaft stiffness you should play.
Final Thoughts
Having the proper shafts in your clubs for your unique game can pay big dividends.
All golfers should seriously consider going through the process of learning how to reshaft a golf club. This will help you become properly fit for your game.
Playing clubs with the correct shafts in them can help make you a more consistent player.
Taking that one step further and learning how to replace your own golf club shafts can save you time and money. Not to mention giving you a feeling of accomplishment as well.
FAQ
Is It Easy To Change Club Shafts?
Drivers and fairway woods with screw-on adapters are typically easier to change than irons or wedges, which require specialized tools and processes such as shaft extraction and installation. Additionally, if the new shaft has different specs than the old one, adjusting other components, such as the grip and swing weight, may also be necessary.
Does DICK’s Sporting Goods replace shafts?
Yes. The Golf Services PROS at DICK’s Sporting Goods offers club repair services, including reshafting of clubs. They have certified fitters which can help you find the right shaft, which is a big part of the process and will be good for beginners who haven’t done this before.
What Glue Do You Use to Reshaft a Golf Club?
There are many brands of epoxy for golf club reshafting jobs. Some top brands include:
- J-B Weld 8281 Professional-Size Steel Reinforced Epoxy
- Brampton Epoxy Pro-Fix 20/20 Long Cure Golf Club Repair
- GolfWorks High Strength Epoxy Golf Club Head Shaft Adhesive
Should I Reshaft My Old Irons?
If the existing shafts are damaged, worn out, or no longer fit your swing, reshafting can be a cost-effective way to improve your irons. Reshafting can also be an opportunity to customize your irons to your specific needs, such as adjusting the flex or weight of the shafts. However, if the existing shafts are in good condition and fit your swing, the cost of reshafting may not be worth the potential benefits.

Brendon is Class A PGA Professional and founded Little Linksters, LLC, and its nonprofit arm, the Little Linksters Association for Junior Golf Development. He won 25+ prestigious industry honors, including the 2017 PGA National Youth Player Development Award. He graduated from the PGA of America Management Program and has a handicap index of 7.8.
He has played golf for over 40 years and currently plays twice a month at the Eagle Dunes Golf Club near Sorrento, Florida. He loves Srixon clubs and plays a ZX5 driver with Z 585 irons. He's written over 60 articles on GolfSpan and specializes in sharing tips to improve your golf game. You can connect with Brendon at LinkedIn, X, IG, FB, his website, or BrendonElliott@pga.com.